 When I first started using Twitter, I began using the official Twitter platform along with their apps for my two mobile devices. In a short time I had tried out many different apps for my iPad and Android phone but still wanted to keep things simple.
HootSuite seemed like a big tool with more features than what I needed. As I became more active on Twitter and Facebook I decided to look into ways to better manage my social media channels. After hearing several reports praising HootSuite’s ease of use and tactical power, I decided to take a closer look. Below I will explain the features that made me a HootSuite fan.
Getting Started – There’s a Tab for That
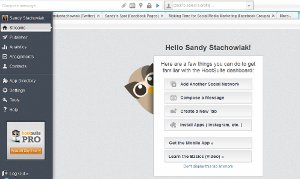
When first using HootSuite you naturally need to set up your Twitter account. Along with that the tool offers options to set up other social media network accounts including Facebook, Google+, LinkedIn, foursquare, WordPress, MySpace and mixi. On the main screen called Streams, you create Tabs for each of your accounts as well as subsections of those accounts, when available.
For example, I created a Tab for my Facebook account and was given the option to create Tabs for my Fan Page and Groups within my Facebook account. This is an extremely helpful feature! You can also set up the Streams displayed within your accounts. For example, within my Twitter tab it shows Home Feed, Mentions, Sent Tweets, Scheduled Tweets, etc.

The HootSuite Dashboard.
After setting up your accounts and Tabs, you may want to use the Install Apps feature. There are too many choices to list, but some of the options include YouTube, Instagram, Flickr, Evernote, HubSpot, and RSS Reader. Once an app is installed, you simply configure your account and add a Tab to your Stream.
Once you have set up at least one of your accounts, it is good time to get used to the left-hand navigation and the options you are given to use. Each area can have more options deeper within it, so getting the hang of it in the beginning is a great idea.
- [Your Name]: This area is where you update your profile, add more social media network accounts, and manage your organizations.
- Streams: This is basically the main screen. It shows all of your Tabs.
- Publisher: This section allows you to view scheduled items, those that need approval, review past scheduled items, and set up RSS Feeds. You can also use the Schedule in Bulk feature if you have a paid plan.
- Analytics: This feature offers some terrific options.
- Quick Analytics allows you to Create a Custom Report or check out stats for URLs, Facebook Insights, and Google Analytics.
- Custom Analytics allows you to Create a New Report, view all reports, those owned by you, shared with you, or your drafts. You can also manage Labels and work with report templates.
- Please note: Some Analytics features are only available with paid plans.
- Assignments: This area is for those who use the Organizations feature. It allows you to share streams with and assign messages to other members of your team.
- Contacts: This section allows you to manage contacts within your Twitter Profiles or Google Pages.
- App Directory: This area shows you the App Directory that you used during your setup. You can view All Apps or limit it to Featured, Premium or Installed Apps. There is also a Request an App button which takes you to the HootSuite site to send them your idea.
- Settings: This section has options to update your Account, Preferences, Archives, RSS/Atom, and Vanity URLs; some of which contain subsections.
- Tools: This area allows you to read details on the HootSuite University, Affiliate Program, Mobile Apps, and Extensions and Downloads.
- Help: This final section has options for the Help Desk, Feedback, Blog, FAQ, Company, About, and Terms and Conditions.
- Logout is at the very bottom of the navigation.

Tweets and Posts – Always the ‘Top’ Priority
The section to enter Tweets and Posts is always at the top of the screen. There are several options within the HootSuite Compose Message box:
- Add a Link with Ow.ly or Shrink a Link using a specific link “shortener” from their drop-down of choices.
- Upload and attach an image or document to add to your message.
- Schedule your message yourself or use the AutoSchedule feature.
- Add your location.
- Select your Privacy Options.
- Select the checkbox to be notified by email when your message is sent (wonderful feature).
- You can also save your messages as drafts and view those drafts here.
After you have composed your Tweet or Post, you simply choose your Profile in the box to the right. This box shows those accounts you have set up and allows you to choose one or all from the list. You can also add another account from this area.
There is also a Search box at the top. You can choose one of the Trending Topics, use your location for results or enter your own search term.

The search function can be filtered by date.
Feature Details – What Is There to ‘Hoot’ About?
There are other tools out there offering some, if not many, of these same features. So, let’s delve into a little more detail on a couple of these features so that you can see why I like this tool so much.
- Publisher: This is the reason I sought out HootSuite to begin with – scheduling my Tweets in advance. Assume that you have scheduled a few messages, now you can use these areas:
- Scheduled: Review your messages and the scheduled dates and times for each. Edit your message or delete it. When editing, all options are allowed that are included with the Compose Message box at the top. This is extremely handy! I have already scheduled Tweets that I decided to spread further apart and used the Edit tool.
- Require Approval: This feature would be useful within an organizational setting. Those with certain account permissions can Approve or Deny messages created by others easily by clicking a checkmark or an “X”.
- Past Scheduled: This brings up a calendar where you can choose to view previously scheduled messages by Day, Week, or Month. You might use this to copy messages that you want to schedule again.
- RSS Feeds: This brings up the RSS/Atom Settings menu (from Getting Started).
- Analytics: This appears to be a very detailed, customizable feature of HootSuite.
- Quick Analytics: If you have used their Ow.ly link shortener, you can view summary stats by date and account, by region, number of clicks, and the most popular links. You can also obtain a detailed status by individual Ow.ly URL. Facebook Insights and Google Analytics are available, but only with paid plans.
- Custom Analytics: This is where the real detail can come into play. You can start with existing HootSuite templates (free and point-based) or create your own report from scratch.
- When creating reports from scratch, you are taken to a separate Report Builder window where you can define all aspects of the report from adding your logo or company header to each element to display on the report. You can select from close to 50 different elements to include on the report. You can schedule the report to be emailed to you and/or other members (for organizations or teams) on a recurring basis as well.
- Graphs, charts, statistics, and number of clicks – it is all there! Bear in mind, some options come only with paid plans and/or points. The points appear to be approximately $1 each and can help fund your report elements or number of reports. Again, this would be really useful for organizations and companies.
New Feature Just Added! – HootSuite Conversations (9/26/12 Beta Release)
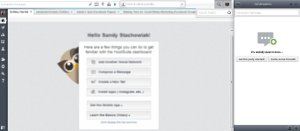
As I was putting some finishing touches on this article, I received a notification for a new HootSuite feature (glad I caught it!) called HootSuite Conversations. Although this feature is in its beta stage, it is worth checking out. Here is what I have found so far:
- In the upper right corner of your display there is a text message-looking icon that once clicked will open your Conversations window.
- There is a small icon in the upper right corner of that window which allows you to pop it out into its own window, if you prefer.
- The first thing you must do is create an “organization” so that you can invite people to chat with you.
- After that, you can:
- Send to Conversation: “Share and amplify messages from Twitter and Facebook directly to a Conversation.” (HootSuite)
- Like and Comment on Posts
- Invite Users for Free
- Download the app to your cell phone
Since the feature was just released, I was not able to play around with it enough to form an opinion. However, it does remind me of the Facebook chat in appearance. Since I did not invite anyone to join my “organization” I was given the option of clicking “All Members” once I made it through the mini tutorial within the window. Unfortunately, that option hung for quite some time and did not end up displaying any results. It is a beta version, so we’ll see!

Nothing is Perfect – What I Do Not Like
All features that I have described above are in the Web-based version of HootSuite and although this is a cross-platform tool, it has its limitations. For example, I could not:
- Edit scheduled messages on my mobile devices
- Request the email notification for scheduled messages on my mobile devices
- Display my Facebook Wall or Groups on my IOS device
- Use the new HootSuite Conversations features on my mobile devices
I also experienced a few issues when setting up my Facebook account. I could not:
- Set up that account from either mobile device
- Set up that account using Firefox (15.0.1) – the pop up window for permissions expanded past my screen length. Although it appeared resizable, it was not. I had to use Internet Explorer instead. But, once it was set up it synced to my other devices upon opening.
All in all, I believe HootSuite is a wonderful tool for managing Twitter AND other social media network accounts. I am anxious to see how successful the new Conversations feature will be. If you are a current user of this tool or plan to give it a try, let me know your thoughts on HootSuite with a comment.
Please note: Some features are only available with paid plans.
- 6 Great Image Tools to Spruce Up Your Website - October 5, 2024
- You Blogged Down a Hill You Can’t Write Back Up - March 20, 2022
- 3 C’s of Content Creation - June 27, 2018
- 3 Easy Ways to Pay Attention to Your Connections - April 28, 2018
- Guidelines for Your Writers and Bloggers Please - December 20, 2017
- 5 Tips to Handle Internet Writing Like a Professional - November 16, 2017
- Great Social Media, Marketing, or Blog Planning Apps - October 2, 2017
- Spring Forward With a Renewed Look for Your Brand - March 9, 2015

Thanks for sharing Sandy — this is a fantastic primer on HootSuite.
How are you finding Conversations so far?
Let us know if we can help with anything, more importantly, HOOT ON!
-HootSuite Community
Hi Connor,
Thanks for your comments. I’m glad you enjoyed the article!
I have not had the opportunity to use Conversations with anyone yet; not by fault of the tool of course! I’m hoping to be able to test it out in depth soon and will keep you updated.
Thanks again!
Sandy S.